Jae Seakahh Take Two

I really enjoyed painting the elf pirate… queen… chick… woman… and I wanted to paint her again. So I chose a really simple, static pose that I feel conveys a lot of her personality. Strong, powerful, confrontational, but also beautiful and intriguing. I hope that is coming across successfully. I’ll walk you through my process step by step and at the end you can see an animated GIF of the progress so far. This illustration is FAR from done, however, but I wanted to have something to show you and thought this would be an interesting way to do so.

ETA: This seems really dark, but one of the final steps I do to an illustration is adjust the values and levels, so that it’s brighter and more easy to “read”. So keep that in mind as you view these previews! 🙂

Step 1: Sketch phase! I love this part. It’s one of my favorite steps. I try a few different poses and settle on one I like. I’ll often find pose reference and have a few open to be able to quickly check proportions and such. This is actually a decently refined sketch, and I’ll try to remember to save the rougher, sketchier part when I do another illustration.

JSOceanWIP1


Step 2: Values! Here is where I determine the basic value composition. I try to stick to about 4 values to determine how everything flows. This could change over the course of the illustration, but I try to keep it basically the same.

JSOceanWIP2

Step 3: Lay in the background! Pretty self explanatory. Again, I’ll try to save more of the steps next time so you can see how I get from A to B while wading through the weeds of blobs and colors.

JSOceanWIP3

Step 4: Start in on the character! I generally start with the face, and in this instance, I later changed my mind regarding the lighting situation, but you can see here that I started to refine her features.

JSOceanWIP4

More refining as well as blocking in clothing and accessories.

JSOceanWIP5

That face was NOT working. Above is where I called it a night and below is where I took her face first thing in the morning. If you’re feeling frustrated with something and it’s late at night… STOP and come back another time. Rest. Relax. Step away for a bit. In this case, I feel like it worked out very well.

JSOceanWIP6

Much pretty. I’ll probably refine more and will add skin texture and such later, but I moved on so I could again come back fresh to the face later. Remember, face and hands on a human are THE most important parts. Get those right, everything else will usually work out ok. Get ’em wrong? Newp. All fail.

JSOceanWIP7

She’s coming along nicely and I’m continuing to work on her. Check back next week and maybe I’ll have her all finished! She’s a personal piece between NDA client work though, so if not, be patient 😉

Here is the animated GIF!

JSOceanGIF1

***

Speaking of client work, I’m happy to say that I’ve had a couple of exciting commissions come my way and I can’t WAIT to show them off! I had the opportunity to work on one of my most favorite properties of all time, one of my most favorite nerd worlds, and it was super fun.

Shiny New Things

My iMac is dying. Slowly. Painfully. And it’s trying to take me down with it. It won’t go without a fight. It likes to freeze when I’m working and the worst part is that regardless how many times I’d saved what I was working on, it won’t save the progress I’ve made since I opened the program. For instance: Say I opened Photoshop and started working at 10 am. I save every 15 minutes, like clockwork. The computer freezes at 1 pm. Everything I’d done since 10 am when I opened the program is gone. I had to start not just saving, but closing and re-opening Photoshop every single time. Ugh.

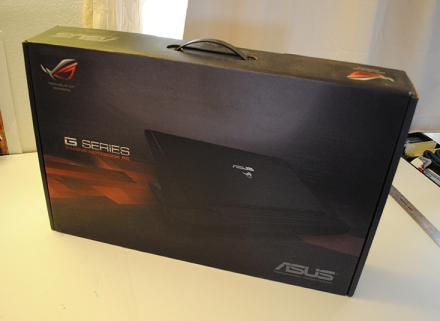
After literally a year and a half of agonizing over which computer system, what type, what I needed, etc, I decided on either a powerhouse laptop workstations such as a Lenovo ThinkPad or Asus ROG, or a Wacom Companion. We purchased the Companion and it was immediately not a good fit for me. While I only use a tiny space on my Intuos to draw on, I am looking up at a very large Dell monitor. The small Companion screen was difficult for me and I didn’t like that all I could see was my massive manhands on the screen. So, back it went.

Finally, I clicked “Confirm Purchase” on this beast:

Asus1 Asus2


I chose a laptop that will also function as my main workstation, using a dual monitor setup (this Dell monitor), but that I can also take with me when I travel to conventions. I’ve had it for a couple of weeks now and I approve. The colors seem great and the speed is awesome. I loathe Windows 8.1. It seems to try too hard to be a tablet type operating system, using “apps” that are stupid and make me want to punch Windows in the face.

But that isn’t the machine’s fault.

Once I had this in my possession, one suspicion I had regarding using a laptop to work in Photoshop was confirmed: The position I had to sit in order to use keyboard hotkeys (my favesies) was very uncomfortable. I did some research and discovered gaming keypads. I was intrigued. Being that I have an Amazon Prime account that includes free shipping and easily returnable everything for any reason whatsoever, I decided to give this thing a go.

Logitech

Unboxing pic!

Logitech1

Logitech3

I set it all up and started programming the keys using the super easy user interface.

Logitech4

I don’t say this about technology often, but I am in love with this thing. My hand is so comfortable and it really helps relieve the stress that gets put on my upper shoulders. My hotkey hand and drawing hand are level and even, rather than staggered as they were before when I had the keyboard behind the Intuos and had to reach all the way up to it to click keys.

Logitech2 Setup

Accurate representation of my feelings toward this gaming keypad for use in digital painting:

TL;DR: Asus ROG G750JZ-DS71 17.3″ Gaming Laptop: 2 thumbs up
Dual monitor set up using Dell UltraSharp U2412M 24″ Screen LED-lit Monitor: 2 thumbs up
Logitech G13 Gaming Keypad: 2 thumbs and 2 big toes up

If you’re considering a new workstation, I hope this helps.

If You’re Not Already Aware… (today we’re dreaming big)

…Jeremy Jarvis, art director for Magic: the Gathering, announced this week that changes have been made to the perks that MtG artists enjoy. It’s being talked about all over, for good reason. Read more about it on these blogs, because Jon and Dan. That’s it, just… because Jon and Dan.

The Art Order
Muddy Colors

I read on Muddy Colors that Jeremy’s response when asked why they made these changes was this:

A huge part of Magic: the Gathering, both as part of the game and as a hallmark of the brand as a whole, is the incredible quality of the artwork. We realize what an enormous contribution the artwork makes. We also realize that we are dependent on a healthy, happy group of professional illustrators to create this amazing work. I literally can not do my job with out the strong drawing arms of men and women more talented than myself bracing me up. Magic strives to be a great client for these artists, and it is very exciting to be able to add a dollar value to that sentiment.

So the breakdown is this. Based on what I’ve read on ArtPact (you do have an account there, right? If you’re a freelancer, you neeeeeeeed to have an account there!), Wizards pays anywhere from $850 to $1500 depending on the card and the artist they’ve hired to work on said card (my numbers may not be accurate, but those are what I’ve read). That’s a pretty chunk of change, if you ask my humble opinion. That buys a whole lot of pizza rolls.

Now, MtG has increased their pay rates by 20%.

Let’s do some math here… 850 x .20 = 170. 850 + 170 = 1,020. That’s for the low end of the spectrum. So now, 1500 x .20 = 300. $1800 for one card.

Now, obviously we do our art all for the love of it, right? Right. But, we all have bills to pay (thanks OBAMA! just kidding). What if it only takes you a week turnaround on a card and you start getting hired by a company that pays $1800 a week?

Let’s dream big and say you do one Magic card every week for a year. Know what you’d make that year?

$93,000.

Moving on.

I’m not aware of how many artist proofs (also know as “whitebacks” because the card is sent to the artist with a blank, white back, and the artist is free to keep or sell them) the MtG artists were allowed before, but they have increased the number of artist proofs for limited run products by 55%.

Magic already allows for the artist to sign, alter, sketch on the back, etc., and sell their artist proofs at conventions. Now, they get moooaaaaarrrr proofs to sell. Woo!

2382441-0374159574-but-w

Thirdsly, their policy on how much WoTC/M:tG artwork you can include in your personal artbook was 25%. What this meant for artist was that if your primary income was from Magic cards… you couldn’t really produce your own artbook to sell to your fans.

Guess what, you guys. That has all changed.

They now allow for 75% of an artist’s artbook to contain WoTC owned work.

That is HUGE for those elite artist’s who have portfolios chock full of Planeswalkers. So happy for those guys.

Lastly, if you’re not already in the know, WoTC allows the artist to sell the original painting, which is already awesome. I’ve seen paintings by Terese Nielsen listed for $2,900. By the way, her art is amazing. Srsly.

With the existence of ArtPact, where artists are able to review their working experience with every company imaginable, this will likely cause other companies to have to improve their perks and pay for the artists, if they want to attract the big hitters and have great art.

Magic the Gathering has become more awesome, and being the industry leader, the likelihood that this will flow downhill and force other companies to change their policies is high. One can hope!

Ok, so I’ve used an exorbitant amount of gifs to say not a whole lot, so I’ll bid you adieu.

How I Use Pinterest for Reference (and Inspiration)

Gooooooood evening sweet angel kittens.

I figured I’d spread some knowledge around like Nutella on a Ritz for you today. I know you’re all DYING to know how Pinterest can benefit you as an artist. It keeps you up at night, I know. Well, fret no more, for I shall teach you my ways. By the way, if you’re interested to see what I’ve pinned, each first mention of a board will include a link. Feel free to browse my boards and follow me if you like.

The idea to use Pinterest as an artist came to me during my first meeting with my mentor, Jon Schindehette. He suggested I gather all of the art that I feel is kind of similar to what I aim to do with my own art. When he mentioned possibly sticking art to a corkboard, my mind went immediately to the virtual corkboard on which I’ve sunk hours of time on collecting recipes and pictures of cute animals. Thus began my Character Inspiration board.

The biggest benefit of using Pinterest, in my opinion, is that I can collect and save reference and inspiration while mobile, using my smartphone or tablet, via the handy dandy and much user friendly Pinterest app. Here are the boards I have created so far that I use most often for art related activities (and, admittedly, as a time sink when I’m bored). Click the image to visit that board!:

Screen shot 2014-07-03 at 6.05.03 PM Screen shot 2014-07-03 at 6.05.27 PM Screen shot 2014-07-03 at 6.05.39 PM Screen shot 2014-07-03 at 6.05.48 PM Screen shot 2014-07-03 at 6.05.57 PM Screen shot 2014-07-03 at 6.06.09 PM Screen shot 2014-07-03 at 6.23.14 PM

So, if you’re new to Pinterest, here is a step by step guide to how you can create boards of your own. You’re on your own figuring out how to register… Sorry.

First things first, decide what type of board this one will be.

For this walkthrough, I’ll create a Reference board for Materials, such as gold, gemstones, and marble. I’ll include everything from stone and fur in the future. On your pinterest page, under “Your Profile & Pins”, click the Create New Board square at the top.

Screen shot 2014-07-03 at 6.06.33 PM

A window will pop up that looks like this:

Screen shot 2014-07-03 at 6.06.47 PM

Name your board whatever you like. You can also add a description and select what type of board it is. The only thing you truly need is a Name, everything else is extra.

Once you create the board, it will be empty like so:

Screen shot 2014-07-03 at 6.08.02 PM

Now comes the fun part… finding things to pin! In the top left corner, type in what you want to search. I chose gemstone first. Autofill can often help out:

Screen shot 2014-07-03 at 6.08.27 PM

A plethora of search results should turn up, unless you’re too specific. Sometimes, you may have to try a variation of search terms to find what you need.

Screen shot 2014-07-03 at 6.08.42 PM

Look at all the pretty colors

When you see something that tickles your fancy, you can either click it and a window will pop up, or you can hover over it and options for “Pin it” or “Send” will appear. Click Pin It:

Screen shot 2014-07-03 at 6.09.09 PM

Ooooh, sparkly. Get to hoarding allofthethings! This is where all my time goes. I spend way too much time pinning things, but it comes in handy later. Even if you don’t need something now, if you like it at all and can think of any reason ever you may need it for reference, pin it.

Once you’ve collected a whole bunch of things, your board should look something like this:

Screen shot 2014-07-03 at 6.13.15 PM

Voila! Super easy and super convenient. Instead of wading through folders on your desktop, everything is right there with a preview image, for easy browsing. If you keep it well organized, you’ll find what you need quicker than a bunny fart.

omgw

Happy pinning!

If you pinned this post… it would be like Pinception.